Print Options:

Yes, You Can Make Great Ribs for Kids

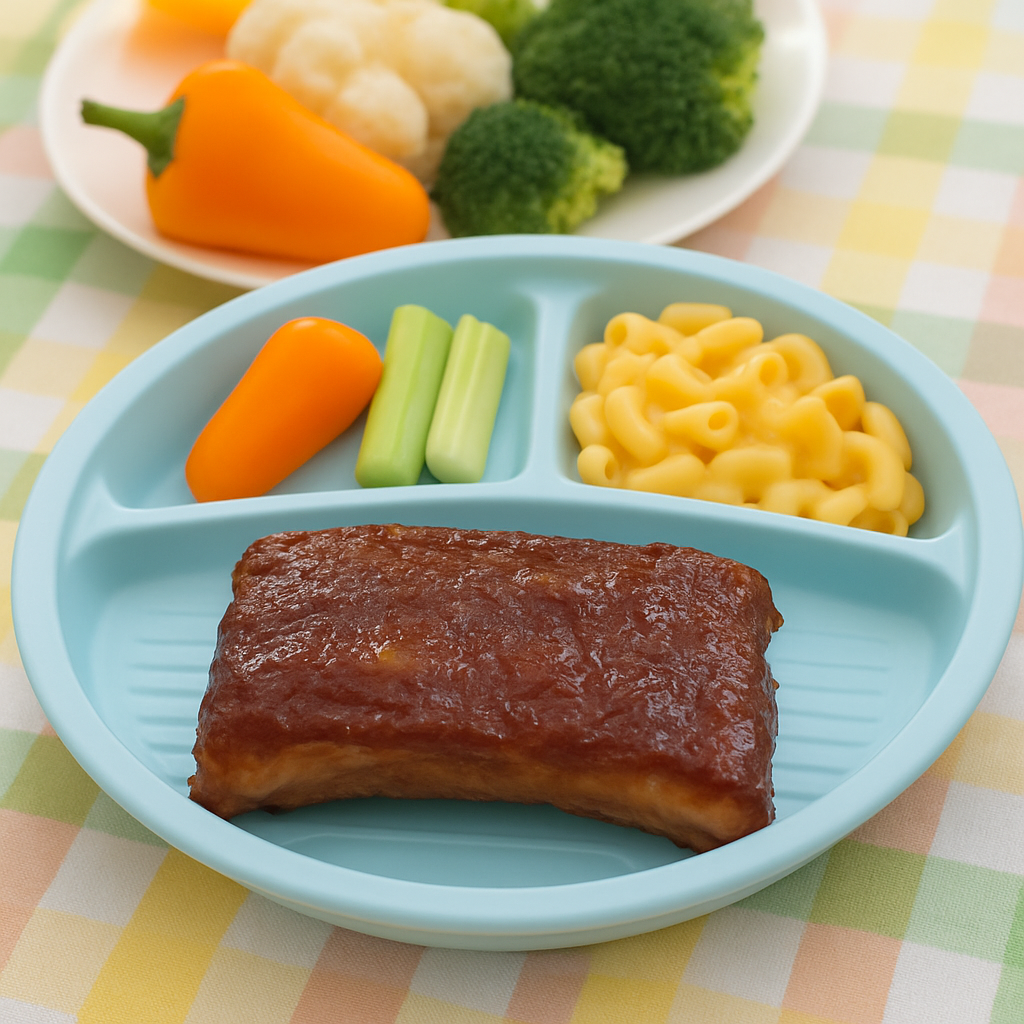
Closeup of a barbecue pork rib lying atop the rest of the rib rack.
Meal(s)
Difficulty Intermediate
Time
Prep Time: 30 mins Cook Time: 2 hrs Total Time: 2 hrs 30 mins
Servings 6
Description

Ribs, admittedly, don’t appear at first glance to be an ideal baby/toddler food—quite the opposite, really. But if you’re willing to commit BBQ heresy, the end result of this recipe is a kind of porcine gummy candy that your child will gleefully inhale. The trick here is to embrace the “meat jello”—the pejorative term barbecue purists use for meat that falls easily off the bone when pulled with your teeth (and not the kind that gets stuck within your teeth). Most restaurants that feature BBQ ribs go this route—usually by boiling the meat first and then baking with sauce to finish—in order to produce the soft and sticky and very easy to eat product with which you are familiar. You’re not going to win any competition BBQ contests with this approach, but you can create a family signature that can easily be scaled up when friends and family come to visit.

Now, this recipe requires more time and steps than others on the website, but the actual amount of effort required on your end is not much more than the most. You could forgo making your own sauce, say, and use a store-bought one; you could skip the saucing and broiling part altogether and squirt it over the top upon serving (or serve nothing at all). You can make this through and around your child’s schedule, too—I’m partial to doing the initial oven cooking during nap time, then the sauce and broiling about 15 minutes before dinner—or you could make it in advance and store it until you need it. Your baby’s never had ribs before—no judgment here on how you make it your own!

Ingredients
  • 1 rack Pork Ribs*
  • Jelly or jam (I use raspberry or fig, but even your usual grape or strawberry jam will work just fine)
  • Soy Sauce
  • Rice Vinegar (balsamic vinegar also works fine in a pinch)
Instructions
    Rib Prep
  1. Preheat your oven to 350.
  2. If he membrane hasn't already been removed from the meat, flip the rib rack(s) over so that the underbelly faces up and look for the thin white web of fat that traverses the length of the underside. Find a spot at one end and pull back on it to lift it up; then run a knife or your finger underneath it to stretch it away from the rib; pull it off and discard.

  3. Flip ribs back over and rub the top and sides with oil. Sprinkle salt all over. (Be judicious with how much you put on, but rest assured: you will not harm your child.)

  4. Rip off a piece of aluminum foil that’s long and wide enough on each side to fold over the top of the rib rack. Fold over onto the rack so that the sides of the foil overlap and the rib is covered, then cinch each overlap so that the rack is tightly wrapped in the foil.
  5. Place the rack in a roasting pan* or a deep baking sheet large enough to hold the ribs, then transfer to your oven. (*The method of cooking is going to produce a lot of pig juice within the foil, so don’t place the ribs directly on the oven rack: if juices trickle out they’ll fall to the oven floor and burn, creating smoke and potentially setting off your fire alarm.)
  6. Rib Cook
  7. Cook the ribs for 30 minutes at 350, then lower oven temperature to 250; cook for an additional 1 hour and 40 minutes. Remove from the oven at time and allow to rest for a few minutes before discarding the foil.
  8. Turn your oven’s broiler to High and move an oven rack to the top position inside your oven. While it heats, make the sauce; instructions in next section. (Skip to next step if using a bottle sauce and/or not broiling.)
  9. Remove rib rack from foil and pan. Using a spoon or sauce mop, cover the top and sides of the ribs with sauce until the entire surface is glazed.
  10. Return ribs to pan and place on top rack of oven. Watching the oven carefully, cook until the sauce glaze is no longer runny but the top has no blackened/burnt parts, roughly 2-3 minutes. Moving or rotating the rack to ensure all parts of the rib caramelize on top.
  11. Remove from the oven and set on a cooking rack to cool.
  12. Sauce Prep
  13. n a small or medium saucepan—use a medium sized one if making two or more racks at a time—cover the bottom of the pan in a shallow mix of the soy and vinegar, with a ratio of about two-thirds soy to one-third vinegar. Place a copious spoonful of jelly in the center of the pan and swirl around so that jelly clumps are dispersed throughout.
  14. Turn the heat to Medium-High and continue mixing as the liquid bubbles and browns on the outside, being careful not to burn. Keep pulling up spoonfuls of the mix until it begins to stretch and get viscous—it should begin to feel sticky and thicker on the spoon. When it reaches similar consistency to that of caramel or hot fudge, turn off the heat.
  15. Give the sauce a few minutes to congeal before placing onto rib rack.
  16. Serve
  17. Cut a few ribs from the middle of a rack and pull most of the meat from the bones; select for your child’s plate those pieces of meat with little or no fat and skin but which feel juicy and soft to the touch. Serve with a little sauce if needed, as well as a bone on which your child can gnaw. I tend to keep any accompanying dishes light: vegetables and fruits.

  18. Adapt
  19. If you’re sensitive about your child’s salt or sugar intake, skip the saucing and broiling steps and just pull the meat from the bone, spritz with lemon and/or dust with no-salt seasoning and serve. I’m a fan of a bit of mustard, cilantro, and the dust from the bottom of a peanut jar myself.

Note

I’ve made this recipe with heritage pork from a respected butcher, and I’ve made it with commodity pork I bought in a “buy one-get-two-free” deal; both came out excellent. Use whatever product you want. If you do buy from a butcher, definitely ask them to remove the membrane for you: will allow you to skip the first prep step—and some grief.

Keywords: toddler dinner, toddler dinners, toddler dinner ideas, toddler meal ideas, easy toddler meals
The recipe author and his then-infant son
Brad

Brad (the Dad) is the founder and Chief Recipe Officer of New Dad's Kitchen. His own cooking/feeding journey started humbly during his son's infancy, preparing and managing his son's bottle intake in order to support his wife; it has since blossomed into a full-on passion to feed his child and family delicious and healthy meals that can satisfy both a toddler and his very tired parents.